Practical Test Reporting

Practical Test Reporting

Introduction
It is very likely you‘ll meet a lot of opposition when you give opinions like ‘this is not good enough to go live’. In test reporting it is strongly recommended to stick to the facts. Do test reporting periodically (e.g. every 2 weeks). This will give valuable information to other project parties. It is said that a software project is like driving on a long, dark road and testing provides the headlights. It is very likely that testing is the only party in the project organisation that has a clear view on the real progress of the project. Share this knowledge!


You might consider these chapters in your Test Report:
Progress reporting
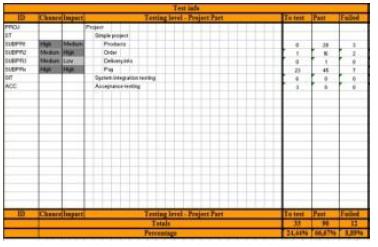
Here you give a view on the statuses of the different test levels / sub projects for the entire project (helicopter view)

This includes:
– Status of Test preparation

  • – Progress of test preparation
  • – Number of tests per Sub Project

– Status Test execution: Here you can show progress by giving percentages and figures regarding:

  • the number of tests that have been executed
  • The number of executed tests that have passed or failed the test

If you use the this method method you’ll have this already in the Project View. Other test management tools all have similar views (See details in Testing Project View.xls ).

Download Testing Project View.xls (password: osst)

Defects reporting
Here you can see the status of the reported bugs
– Open defects for the different Sub Projects
– Total open defects per priority
– Total open defects per detail status (reported, ready to test, accepted)

If you use the this method you’ll find a summary of the reported defect statuses for every SubProject. At the same time you’ll find the number of ‘Show stoppers’.

Refer Project_view_test_execution_example.xls (password: osst) for above templates.

If you like more detail in the Project View.xls on the other priority statuses (Major, Minor, Nice to have), just add them to the Project View.

Workload estimates

Here you can give an estimate on the workload that is to be expected for testing in a certain period ahead (e.g. 2 weeks)
This can help you to define the risk of not having enough time to test before going live

– Issues you can include
– Workload for test preparation and review activities
– Workload for test execution

Risks
This is a summary of all the issues that can slow down / obstruct the progress of testing.
This might include:
– a planning that is to tightly (e.g. not enough time reserved for testing)
– lack of information (e.g. analysis documents not delivered on time)
– people not available (e.g. illness of key tester, no testers found, …)
– Later than planned delivery of the application by IT

Guide to Effective Test Status Reporting and Metrics Collection – Part 1


Test Status Report
Test Status Reporting is a formalized reporting on the status of the project from a testing point of view. This is part of the project Communication plan. The Report shows quantitative information about the project.
Test Status Reporting is the component that informs key project stakeholders of the critical aspects of the project’s status. Good status reporting prevents surprises to project sponsors and stakeholders. Formal status reporting needs to be provided as part of the project steering committee meetings.
Purpose
The purpose of a Test Status Report is to provide an ongoing history of the project, which becomes very useful in terms of tracking progress, evaluation and review. Test Status Reports forms a part of the Project Review Process both during and after completion of the project.A Test Status Report should identify the key areas of importance that will assist the stakeholders of the project in determining the “state” of the software development and test efforts. It helps in answering one of the most asked questions of system testers … “Will the software be ready for release on the agreed upon date?”
The Test Lead should try to maintain a careful balance between timeliness, accuracy, and consistency when preparing these reports as the status of the defects keeps changing.

Owner(s)
The person responsible for managing all test activities (Test Manager or Test lead) should be the owner of the test status report.

Who should use it?
Test Status Report is a document that will be used by the Project Manager to understand the ongoing history of the project, which becomes very useful in terms of tracking progress, evaluation and review. Test Status Reports forms a part of the Project Review Process both during and after completion of the project.
The target audience for a Test Status Report could vary. Any one interested on project health can be the audience. This can be the Project Management team, Project Steering committee, Customer or other key stakeholders of the project. (Click on the below pic to see clear view)
Weekly Ststus Report

A brief description of the different attributes of test status report (figure-1) presented below.
1. Project Name – The project name that you are reporting metrics on.
2. Duration – The reporting period
3. Report by – Owner / Author of the Report.
4. Report to – Target Audience.
5. Previous weeks Accomplishment – Activities performed after last reporting date.
6. Missed Accomplishment – Not able to work on any planned activity of the previous report.
7. Plans for this week – Future planning for the tasks to be performed during the current reporting period.
8. Issues

The role of a Test Lead is to give approximate if not accurate reports on the status of the project. At the start of test execution, Test Lead presumes that all the risks to be addressed by this phase of testing still exist. As we progress through the test plan, one by one, risks are cleared as all the tests that address each risk are passed. Halfway through the test plan, the tester can say, “we have run some tests, these risks have been addressed, here are the outstanding risks of release.”

Suppose testing continues, but the testers run out of time before the test plan is completed. The go live date approaches, and management wants to judge whether the system is acceptable. Although the testing has not finished, the tester can say, “we have run some tests, these risks have been addressed, here are the outstanding risks of release.” The tester can present exactly the same message throughout the test phase, except the proportion of risks addressed to those outstanding increases over time. How does this help?

Throughout the test execution phase, management always has enough information to make the release decision. Either management will decide to release with known risks, or choose not to release until the known risks (the outstanding risks that are unacceptable) are addressed. Most of the time Coding gets 90% of the effort and testing is squeezed yet again. To avoid this, code and test activities should be defined as separate tasks in project plan.

Most managers like the risk-based approach to testing because it gives them more visibility of the test process. Risk-based testing gives management a big incentive to let you take out a few days early in the project to conduct the risk assessment. All testers have been arguing that they should be involved in projects earlier. If managers want to see risk-based test reporting they must let testers get involved earlier. This must be a good thing for testers and our projects.

9. Cumulative Issues– Issues from previous report, if not addressed should be listed here.
10. Test execution Details for previous week – Test details for the reporting period

      1. Total effort spent on test execution
      2. Total number of functionality tested during the reporting period.

11. Test Summary

      1. Total number of test cycles, number of defects found, and defect tracking details should be listed in this section.
      2. Test Coverage details in terms of functionalities tested and test cases executed should be detailed in this section.

12. Project Milestone – Important project schedule from a testing point of view should be listed here.

The Test Status report should also represent the status through charts and graphs for easy and better understanding.
The following are few charts that can be included in the test status report.


Functionality Coverage vs. Duration
Functionalities tested during different releases or during different reporting period can be shown in a graph to give an indication about the progress of test coverage.
Functionality Coverage chart in Software Testing
(Figure-2 : Functionality Coverage chart)


Defects reported vs. closed
The above report shows the find and fixes counts for bugs reported against the reporting period. This gives Management an idea of the defect trends. A flattening cumulative open curve indicates stability, or at least the inability of the test team to find many more bugs with the current test system. A cumulative closed curve that converges with the open curve indicates quality, a resolution of the problems found by testing. Overall, this chart gives a snapshot of product quality as seen by Testing, as well as telling Management about the bug find and fix processes.
Defect status
(Figure-3: Defect status)


Defect Location
This graph displays the defect occurrence in different modules. This helps the management in assessing the most problematic area in the project. Based upon this a root-cause analysis can be conducted and appropriate corrective measures can be taken to reduce the risk.
Defect Location in Software Testing
(Figure-4: Defect Location)


Defect Classification
These details help in conducting a root cause analysis and taking corrective measures to improve product quality.
Defect Classification in Software Testing
(Figure-5: Defect Classification)


Test Case Progression Chart
This gives a clear indication of test progress against the test plan over a time.
Test Case Progression Chart
(Figure-6: Test Progression)


Severity wise Defect Distribution
This gives a indication about the severity wise defect distribution.
Severity wise Defect Distribution
(Figure-5: Defect Distribution)


What should be the ideal frequency?
The frequency of test status report can be decided based upon the project test plan.
In case of a small project where the releases to testing team happens every alternate day , status report should be prepared on a daily basis to keep the management informed about the test progress.
But in case of large projects where the application released on in a month for testing status report should be prepared once in a week.

Periodic meetings should be held to discuss the project status, either verbally or based on the Test Status Report. The meetings should be often enough that progress could be reported against a number of milestones since the last meeting.

Read 2nd Part: Guide to Metrics Collection in Software Testing (includes Benefits of implementing metrics in software testing)

References: 
1. Measuring software product quality during testing by Rob Hendriks, Robert van Vonderen and Erik van Veenendaal
2. Software Metrics: A Rigorous Approach by: Norman E. Fenton
3. Software Test Metrics – A Practical Approach by Shaun Bradshaw
4. Testing Effectiveness Assessment (an article by Software Quality Consulting)
5. P.R.Vidyalakshmi
6. Measurement of the Extent of Testing (http://www.kaner.com/pnsqc.html)
7. http://www.stickyminds.com/
8. Effective Test Status Reporting by Rex Black
9. http://www.projectmanagement.tas.gov.au/guidelines/pm5_10.htm
10. http://whatis.com
11. Risk Based Test Reporting by Paul Gerrard


Golden Rules for Bug Reporting

Introduction
Read these simple golden rules for bug reporting. They are based on years of practical testing experience and solid theory.
Make one change request for every bug
– This will enable you to keep count of the number of bugs in the application
– You’ll be able to give a priority on every bug separately
– You’ll be able to test each resolved bug apart (and prevent having requests that are only resolved half)

Give step by step description of the problem:
E.g. “- I entered the Client page
– I performed a search on ‘Google’
– In the Result page 2 clients were displayed with ‘Google’ in their name
– I clicked on the second one
—> The application returned a server error”

Explain the problem in plain language:
– Developers / re-testers don’t necessarily have business knowledge
– Don’t use business terminology

Be concrete
– Errors usually don’t appear for every case you test
– What is the difference between this case (that failed) and other cases (that didn’t fail)?

Give a clear explanation on the circumstances where the bug appeared
– Give concrete information (field names, numbers, names,…)

If a result is not as expected, indicate what is expected exactly
– Not OK : ‘The message given in this screen is not correct”
– OK: ‘The message that appears in the Client screen when entering a wrong Client number is “enter client number”
– This should be: “Enter a valid client number please”

Explain why (in your opinion) the request is a “show stopper”
– Don’t expect other contributors to the project always know what is important
– If you now a certain bug is critical, explain why!

Last but not least: don’t forget to use screen shots!
– One picture says more than 1000 words
– Use advanced toold like SnagIt (www.techsmith.com/screen-capture.asp)

When testers follow these rules, it will be a real time and money saver for your project ! Don’t expect the testers to know this by themselves. Explain these rules to them and give feedback when they do bad bug reporting!

Function Testing Step by Step – Part 2

Click Here to read Function Testing Step by Step – Part 1

Component and component integration testing
– For now, let’s not go in to that. This is a chapter on functional testing. Component and component integration testing are a responsibility of the Development department.
System and System Integration Test Execution
– Once IT tells you can start testing: do some smoke tests:
    – Go through the application part you want to test
    – Check whether you can walk trough the application
    – Look for server errors, buttons that don’t work, navigation problems.
    – Make a decision on this: is the application good enough to start system tests. If not: back to Development Team.

– Test execution
    – Take the lists you made in system test preparation
    – Check every test and mark it ‘pass’ or ‘fail’
    – Leave things you can not test on status ‘to test’ (don’t put them all on ‘fail’!)

    – Make good bug reports for every ‘fail’:
        – make a link with your test case list
        – place this bug in status ‘reported’

    – Once the system tests pass reasonably well, start exploratory testing.
        – Just put away the analysis documents and think destructive while you perform the tests.
        – Behave like you are an end user. What do you want to do with this application?

– Talk about the bugs before programming starts
    – Meet with IT, business and analysts to talk about every bug:
        – Is it relevant? if not : remove the bug from your project view
        – Give priority to each bug (show stopper, major, minor, nice to have)
        – If you work with release, ask in which release this bug has to be resolved
        – Keep track of priority / release number, etc

– Once the bug is fixed, perform retest of the problem as mentioned in the bug report
    – When a test fails, talk about it with IT, business and -if necessary- analysts before programming starts.

Acceptance test execution
– Preparation
    – Book test rooms / invite testers long enough before testing
    – Remind them the day before test execution
    – Make short introduction demo on what you expect of the acceptance testers
    – Tell them how to report to you
    – Explain golden rules for bug reporting

– Let real end users perform the tests you made during acceptance test preparation
– Ask them to use real live data
– After they performed the prepared tests, ask them to perform some exploratory testing
– Make good bug reports for every ‘fail’
– Talk about the bug before start programming (IT, business, testing, analysts)

This is how your project might look like while executing testing:
Project_view_test_execution_example.xls (password: osst)

Functional Testing Step by Step – Part 1

Introduction
Are you an aspiring Test Lead or Test Manager? Are you ready for transition from test engineer to lead or Lear to a Manager? Here we explain how to set up good testing step by step. You will not find a lot of theory here, only a practical introduction on how to perform good functional testing. You can consider it as a Checklist or Guidelines set. These are the points to take care while planning the test project.


Planning
We are now at the very beginning of the software project. Someone has decided this project has to be started, so why should you wait to get started? Because you’re a tester, you still have lots of time? If you start at the end of the software life cycle, you’ll be in trouble. There’s a lot you can do. Start now!

Method
Make a decision on what testing method you are going to use

Tools
– What test management tool?
– Which Defect tracking tool are you going to use?
– What performance tool?
– Do you need more study on these tools, contact people?
– How and when will performance testing be performed?
– Need to customize the tools?
– Authorizations for these tools?

Test room/ Materials
– Test room?
– PC’s available?
– What software is needed on the testers PC’s?

Test environment
– Is there a separate environment for testing purposes only?
– Who can give authorization on it for your testers?
– Are all parts of the production environment available in the test environment? If not, how to resolve?
– Set up a directory per project for testing and define who has read/write rights / read only rights

Prepare demo’s
– Explain the basics of software testing to project players and testers
– Explain Project View (helicopter view) and other test level views
– Explain why you want the testers to do test preparation sessions before development
– Explain the Golden Rules for Bug reporting
– Explain for every level of testing what you want from the testers
– Explain IT why you want them to perform good testing
– Explain how testers are going to report to you? (Word document? Bring in defects in the bug tracking tool – make sure they have authorization for this)

Testers
– Look for good testing profiles
– End users (super users with the right attitude?)
– System testers (in house? outsourcing?)
– Performance testing, who?
– Do you need consultancy?

Arrangements with IT department
– Make arrangements with IT department on how they are going to test
– Talk about exit and entry criteria (when is software good enough to deliver to test team)
– Ask about organization of the Component and Component integration testing
– How are the builds going to be done? Once a week? Every day?
– Will there be time for smoke tests between the build and the start of your testing?
– Propose a demo for the developers on testing
– Ask about the IT organization of automated component testing

Acceptance test preparation
Okay, the analysts start to talk to key users to define what they need.
Don’t sit and wait till they are finished. Get your acceptance test preparation started!

Organize test preparation sessions with end users (and i mean, do this at the very beginning of the project)
– Ask end users what they really want
– Ask them to give examples of real live cases
– Go with the end users trough the current application or manual method they use now to perform what the application will have to do later
– Ask for details and keep on asking
– Make a list of the cases they mention
– Use a tool, excel.

    • These are the test cases you are going to use at test execution
    • Make a second list of the questions they might have

– Hand over these lists to analyst team (helps to find the bug early)  

Create (and maintain) an helicopter view on your project
– Decide for each project part what is the

    • ‘Impact’ of a bug when it goes wrong (Business van tell you that)
    • ‘Change’ of anything going wrong (IT can tell you this)

System test preparation  
– Take each analysis document and break it down into tests that can have a ‘pass’ or ‘fail’ answer
– This will get you a certain number of test cases
    – make a list, one per project part analysis
    – Use a tool, excel.
    – These are the test cases you are going to use at test execution  

– Don’t put anything in these tests that is not in the analysis documents – You can structure the list by using these divisions :
    – check fields:
         – Is the field there?
         – correct type (checkbox, input field, dropdown)

     – check buttons/links:
         – Is the button/link there?
         – does it do what it has to do

     – validation of fields:
         – e.g. is website name correct / incorrect

     – cross check fields:
         – if one field has a certain value this might have implications on another field

     – Processes:
         – make tests on the working of background processes
         – on a given input, what is the expected output
         – here you might ask more input from specialists to get good test cases

     – Database actions:
         – make tests for database fields that will change but are not on screen
         – check IT on how to make these visible

     – Navigation

– If you have questions about the analysis, talk to the analysts! If you find a bug here, no harm is done (just changing the text will do).
 – Look for incomplete info in the analysis (not enough detail, e.g. no defaults, dropdowns without detail, processes that are not clearly described, errors in navigation plan, etc). Make sure to report this information to the analysts.
– When ‘impact’ and ‘chance’ are high for this part of your application, make sure to make a very detailed test preparation. If both are low, don’t spend too much time on it.  

This is how your project might look like at the end of the test preparation phase:
Project_view_after_preparation_example.xls (password of file: osst)

Click Here to read Function Testing Step by Step – Part 2