LoadRunner Tips

Note – These tips are very helpful. most of them are taken from http://kb-web.mercury.com/

 
1. To get the password of an auto-generated lr_decrypt() function:
char * password;
web_set_user(“2testuser”, lr_decrypt(“41754c8245221983220368db”),”preview.fanniemae.com:80″);
password=lr_decrypt(“41754c8245221983220368db”);
lr_output_message(“password:%s”,password);

2. Problem Description: How to capture the total bytes of a request/response from the server

Solution: Use the web_get_int_property function
In VuGen 8.1, there are additional options available for the web_get_int_property function like HTTP_INFO_TOTAL_REQUEST_STAT and HTTP_INFO_TOTAL_RESPONSE_STAT. These options return the accumulative size (including header and body) of requests and responses.
Related articles that may be of interest:
Problem ID 29810 – How to verify the size of the last download in bytes
Problem ID 23220 – How to capture HTTP return code information
Problem Description: How to verify the size of the last download in bytes

Solution: Use web_get_int_property( HTTP_INFO_DOWNLOAD_SIZE )
You can use the web_get_int_property() function with HTTP_INFO_DOWNLOAD_SIZE to check the size (in bytes) of the last download.
Example:
long i;
//Start a transaction to download the file.
lr_start_transaction(“file_download”);
//HTTP call to the .pdf file
web_url(“<HTTP call to the pdf file>”);
//Get the download size.
i = web_get_int_property( HTTP_INFO_DOWNLOAD_SIZE );
//Output file size
lr_output_message(“File size downloaded : %d”, i );
//End a transaction to download the file.
lr_end_transaction(“file_download”, LR_PASS);

Problem Description: How to capture HTTP return code information
The user uses the following function to capture the return code of a webpage:
   HttpRetCode = web_get_int_property(HTTP_INFO_RETURN_CODE)
However, this function only captures the last status code that was received. If there is a redirection in between, it is not reflected. How can user detect redirection on a page?

Solution: Function to capture HTTP return code
To capture the HTTP returned code, you can use the web_get_int_property function.
Example:
HttpRetCode = web_get_int_property(HTTP_INFO_RETURN_CODE)
Note:
The web_get_int_property function only captures the last status code that was received. If there is a redirection in between, it is not reflected. To get all of the responses, you can use the web_reg_save_param function with:
1. The “ORD=ALL” attribute to capture all occurrence.
2. The “Search=Headers” attribute to search the response header only.
Example:
web_reg_save_param(“response”,”LB=HTTP/1.1 “, “RB= “, “Search=Headers” ,”ORD=ALL”, LAST);


Problem Description: How to change the default host in the Controller
When creating a new scenario, LoadRunner automatically adds “localhost” as the default Load Generator machine. Is it possible to change this default?

Solution: Change DefaultHost in the wlrun7.ini file
1. Go to the C:/Windows or C:/WinNT folder.
2. Open the wlrun7.ini file in Notepad.
3. Search for “DefaultHost.”
4. Replace “localhost” with the name or IP address of the machine you want set as the default host.


Problem Description: How to save the list of Load Generators or hosts in the Controller

Solution: Use the “Save LoadGenerator List as Default” option
1. Create a new scenario.
2. Click on the “Generators” button to bring up the list of Load Generators.
3. Click on the “Add” button to add the new hosts.
4. Repeat step 3 for all the hosts.
When you are done, go to Scenario -> “Save LoadGenerator List as Default.”


Problem Description: Which file stores the Load Generator list
Which file on the Controller machine stores the list of Load Generators when the option Scenario -> Save Load Generators as Default list is selected?

Solution: The wlrun7.hst file located in the C:winnt folder
The wlrun7.hst file located in the C:winnt folder. It has sections defined for each of the Load Generators.


Problem Description: How to delete default URL on the Web Recorder’s pull down menu
When the user opens the Web Recorder (starting with LoadRunner 7) and tries to record, the recorder opens a list of URLs that were recently accessed. How can the user remove unwanted entries from this menu?

Solution: Edit the HKEY_CURRENT_USERSoftwareMercury InteractiveQuickTestRecording History registry key
All recently accessed URLs’ information is stored in the registry under HKEY_CURRENT_USERSoftwareMercury InteractiveQuickTestRecording History.
To remove an unwanted URL:
1. Go to Start -> Run and enter “Regedit” to open the Registry Editor.
2. Open the HKEY_CURRENT_USER -> Software -> Mercury -> QuickTest -> Recording History folder. This lists all the URLs in the Web Recorder’s pull down menu.
3. Delete those entries you no longer want to appear.


Problem Description: How to remove the scripts that are listed in “Available Scripts”
How can the user remove the scripts that are listed in “Available Scripts” when creating a new scenario?

Solution: Delete the unwanted script entries from the registry
All recently accessed URL information is stored in the registry under HKEY_CURRENT_USERSoftwareMercury InteractiveRecentScripts.

To remove unwanted URL:
1. Go to Start -> Run and type in regedit to open the Registry Editor.
2. Open the HKEY_CURRENT_USER -> Software -> Mercury -> Recent Scripts folder. This lists all the files listed in the “Available Scripts” section when the Controller is launched.
3. Delete those entries you no longer want to appear.

Record on LoadRunner’s VuGen using a QTP script – Automation testing Tip

1. Bring up VuGen. Create a New script selecting Web (HTTP/HTML) protocol.

2. Start record button.

3. Then, bring up QTP and make sure the option on “Record and Run Settings” dialog be with– Record and Run test on any Open web browser, radio button.

4. Start ‘Record’ on QTP and perform the user activities on the browser invoked by the VuGen.

5. Both VuGen and QTP would record the actions on their interfaces.

This way we can make sure the VuGen to record the same sequence of user actions/events by ‘Replaying’ the QTP recorded script, after a browser is initiated by the VuGen’s recording engine.

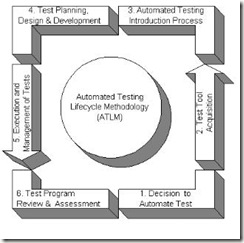
Automation Testing LifeCycle/Process Simplified

Automation Testing LifeCycle/Process Simplified

Automation Testing LifeCycle

Phase Activities Outcome
Planning Create high level test plan Test plan, Refined Specification
Analysis Create detailed test plan, Functional Validation Matrix, test cases Revised Test Plan, Functional validation matrix, test cases
Design test cases are revised; select which test cases to automate revised test cases, test data sets, sets, risk assessment sheet
Construction scripting of test cases to automate, test procedures/Scripts, Drivers, test results, Bug Reports.
Testing cycles complete testing cycles Test results, Bug Reports
Final testing execute remaining stress and performance tests, complete documentation Test results and different metrics on test efforts
Post implementation (See Post Project Reviews in testing) Evaluate testing processes Plan for improvement of testing process


Guidelines/Best Practices for effective Software Test Planning – Part 2

Guidelines/Best Practices for effective Software Test Planning – Part 2

Test Plan First

Following are the guidelines/best practices for effective test planning:

  • Identify the requirements to be tested. All test cases shall be derived using the current Design Specification.
  • Identify which particular test(s) you’re going to use to test each module.
  • Review the test data and test cases to ensure that the unit has been thoroughly verified and that the test data and test cases are adequate to verify proper operation of the unit.
  • Identify the expected results for each test.
  • Document the test case configuration, test data, and expected results. This information shall be submitted via the on-line Test Case Design(TCD) and filed in the unit’s Software Development File(SDF). A successful Peer Technical Review baselines the TCD and initiates coding.
  • Perform the test(s).
  • Document the test data, test cases, and test configuration used during the testing process. This information shall be submitted via the on-line Unit/System Test Report(STR) and filed in the unit’s Software Development File(SDF).
  • Successful unit testing is required before the unit is eligible for component integration/system testing.
  • Unsuccessful testing requires a Program Trouble Report to be generated. This document shall describe the test case, the problem encountered, its possible cause, and the sequence of events that led to the problem. It shall be used as a basis for later technical analysis.
  • Test documents and reports shall be submitted on-line. Any specifications to be reviewed, revised, or updated shall be handled immediately.
  • Deliverables: Test Case Design, System/Unit Test Report, Problem Trouble Report(if any). 

Reference/Source: http://users.csc.calpoly.edu/~sroliver/csc405/test/swtplan1.html

Must Read – Test Plan Prep Guidelines – Part 1

Purpose & Advantages of Test Plan

Purpose & Advantages of Test Plan


 Test Plan First


TEST PLAN

  • The test plan keeps track of possible tests that will be run on the system after coding.
  • The test plan is a document that develops as the project is being developed.
  • Record tests as they come up
  • Test error prone parts of software development.
  • The initial test plan is abstract and the final test plan is concrete.
  • The initial test plan contains high level ideas about testing the system without getting into the details of exact test cases.
  • The most important test cases come from the requirements of the system.
  • When the system is in the design stage, the initial tests can be refined a little.
  • During the detailed design or coding phase, exact test cases start to materialize.
  • After coding, the test points are all identified and the entire test plan is exercised on the software.

Purpose of Software Test Plan:

  • Test Plan Ensures all Functional and Design Requirements are implemented as specified in the documentation.
  • To provide a procedure for Unit and System Testing.
  • To identify the documentation process for Unit and System Testing.
  • To identify the test methods for Unit and System Testing.

Advantages of test plan

  • Serves as a guide to testing throughout the development.
  • We only need to define test points during the testing phase.
  • Serves as a valuable record of what testing was done.
  • The entire test plan can be reused if regression testing is done later on.
  • The test plan itself could have defects just like software!

In software testing, a test plan gives detailed testing information regarding an upcoming testing effort, including

  • Scope of testing
  • Schedule
  • Test Deliverables
  • Release Criteria
  • Risks and Contingencies

Test Plan Preparation Guidelines – Part 1

The software test plan is the primary means by which software testers communicate to the product development team what they intend to do. The purpose of the software test plan is to prescribe the scope, approach, resource, and schedule of the testing activities. To identify the items being tested, the features to be tested, the testing tasks to be preformed, the personnel responsible for each task, and the risks associated with the plan.
The test plan is simply a by-product of the detailed planning process that’s undertaken to create it. It’s the planning that matters, not the resulting documents. The ultimate goal of the test planning process is communicating the software test team’s intent, its expectations, and its understanding of the testing that’s to be performed.
The following are the important topics/guidelines, which helps in preparation of Test plan:

High-Level Expectations
The first topics to address in the planning process are the ones that define the test team’s high-level expectations. They are fundamental topics that must be agreed to, by everyone on the project team, but they are often overlooked. They might be
considered “too obvious” and assumed to be understood by everyone, but a good tester knows never to assume anything.

People, Places and Things
Test plan needs to identify the people working on the project, what they do, and how to contact them. The test team will likely work with all of them and knowing who they are and how to contact them is very important. Similarly, where documents are stored, where the software can be downloaded from, where the test tools are located, and so on need to be identified.

Inter-Group Responsibilities
Inter-Group responsibilities identify tasks and deliverable that potentially affect the test effort. The test team’s work is driven by many other functional groups – programmers, project manages, technical writers, and so on. If the responsibilities aren’t planned out, the project, specifically the testing, can become a worst or resulting in important tasks been forgotten.

Test phases
To plan the test phases, the test team will look at the proposed development model and decide whether unique phases, or stages, of testing should be performed over the course of the project. The test planning process should identify each proposed test phase and make each phase known to the project team. This process often helps the entire team from and understands the overall development model.

Test strategy
The test strategy describes the approach that the test team will use to test the software both overall and in each phase. Deciding on the strategy is a complex task one that needs to be made by very experienced testers because it can determine the successes or failure of the test effort.

Bug Reporting
Exactly what process will be used to manage the bugs needs to be planned so that each and every bug is tracked, from when it’s found to when it’s fixed – and never, ever forgotten.

Metrics and Statistics
Metrics and statistics are the means by which the progress and the success of the project, and the testing, are tracked. The test planning process should identify exactly what information will be gathered, what decisions will be made with them, and who will be responsible for collecting them.

Risks and Issues
A common and very useful part of test planning is to identify potential problem or risky areas of the project – ones that could have an impact on the test effort.

Reference/Source: Software Testing, Second Edition, By: Ron Patton

Read – Guidelines for effective test planning – Part 2