Once you plan your load test, the next step is to perform the load testing process. Load testing is the process of identifying performance bottlenecks in your web application under normal and peak loads. This will help you to tune the resources (both the hardware and the software) of your web application and optimize the user experience for maximum performance.
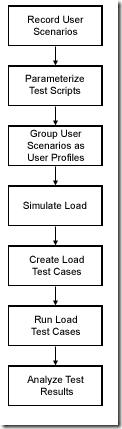
Following are the steps involved in QEngine Load Testing process:
 Step 1: Record User Scenarios
Create a load test script and record the user scenarios or transactions in your web application. Here, the user scenarios are the one identified in your planning phase in Step1.
Step 2: Parameterize Test Scripts
Once you have your basic recorded load test script, you have to parameterize the load test script to vary the input to the server. This will help you to emulate real-world testing and avoid errors arising out of duplicate values.
Identify the list of values to be parameterized. Replace the recorded values with parameters to pass different set of data to the server each time the script is executed. For example, user name and password values can be parameterized using the Dataset option in a login script to pass different user name and password for each replay. The values for the parameter can be fetched from an external datasource (CSV or database) or from a cookie or from a previous response body or from a hidden field or from a previous URL or by executing a Javascript or using a constant value.
Step 3: Group User Scenarios as User Profiles and Associate % of Workload
After recording the user scenarios as load test scripts, the next step is to group the user scenarios as user profiles and configure the % of workload for each user scenario. The objective of grouping the user scenarios as user profiles is to map the real time user activities i.e., users accessing different parts of the web application, performing different operations. User profiles greatly increases the accuracy of your load test, since it better simulates what your web server will be seeing in the real world.
For example, consider the following user scenarios grouped as user profile for the sample online bookstore application:
User Profile: Named testprofile includes three user scenarios where 60% of users are browsing the home page, 20% of users are purchasing items from the shopping cart and the other 20% of users are searching for required items.

Step 4: Simulate Load
In this step, you examine your web application’s behavior under simulated load conditions. This will help you to identify whether your application is trending toward or away from its defined performance objectives. Once you identify the load type to be simulated based on the instructions given in Step 4 in Planning Your Load Test, select the appropriate load type and configure the workload details. For example, let us consider the following load for a sample online bookstore application.
- Load Type – Normal
- User Count – 100 users
- Sample Period – 60 seconds
- Test Duration – 120 seconds
In the above configuration, sample period is 60 seconds and the test duration is 120 seconds. With this configuration, QEngine will run for 2 (120/60) samples. You should always ensure that the given sample period is enough to complete all the urls within the given test duration time.
Load Distribution for the above load configuration in Step 4 and user profile configuration as given in Step 3 will be as follows:

Step 5: Create Load Test Cases
Create load test cases where you associate the user profiles (one or more user scenarios) created in Step 3 with the workload (users to be simulated against the web application) created in Step 4. Each test case consists of the following:
· User Profiles with key user scenarios and unique settings specific to each scenario.
· Workload details which includes load type, users to be simulated, sample period and test duration.
· Report Sample Period.
Here, report sample period is the length of time over which the values collected during the testcase execution should be reported. For example, if the sample period is 15 seconds, the statistics views showing the results of a test will have values every 15 seconds. This value should be shorter for short tests, and longer for long tests.
Step 6: Run Load Test Cases
Run the load test case. You can run the load test case created in Step 5 using the verify mode to verify it with a single user or with the configured load using the following steps:
- Click on the Start Play option from QEngine Toolbar.
- From the Play Details pane, select the load test case to be verified from the Select a Test Case combo and choose the Run with Verify mode or Configured mode radio option.
During load test execution, QEngine automatically simulates the test runs for various workload models emulating real-time user roles and access patterns. Displays runtime graphs during execution and after test completion, displays the detailed reports and graphs.
Step 7: Analyze Test Results
The final step is to analyze the test results which is both the most important and the most difficult part of performance testing process. To make this process easier, the reports and graphs page that gets displayed after load test execution is organized in a clear and easy to understand format. This will help you to just click the various links in the left pane and identify the performance bottlenecks.
When you run the load test for the test case created in Step 4, the results will be as follows:
Avg. Hits/sec or load generated against server: 20 hits per second.
Avg. Page Download Time: 4,371 milliseconds.
Avg. Throughput or Data Transfer Rate: 83,552 bytes per second.
Avg. Response Time or How Fast your Server Responds: 4,334 milliseconds response time.
Avg. Error Percentage: 25% for 120 active users when the elapsed time is at 30 seconds.
Server Monitoring Results:
% CPU Usage: 40 percent
Memory Usage: 60 percent
References:
http://www.manageengine.com/products/qengine/web-performance-evaluation-guide.html
https://qengine.wiki.zoho.com/Understanding-Load-Testing-Process-.html
Recent Comments